This article walks you through Razorpay Integration in Android. Razorpay is an Online Payment System that provides payment methods like UPI, Debit cards, Credit cards, Net Banking, and many popular mobile wallets. This system makes payment easier and more accessible for users. Unlike many other payment gateways, Razorpay provides a clean and easy-to-use interface which gives the user confidence and ease of use. So let’s see how to Integrate Razorpay into your Android application.
This digital payment platform makes links between many other apps in one of the levels crossed by Razorpay.
Razorpay integration in Android is a simple process that we are going to see in this article. You can also watch YouTube videos for Integration from our YouTube Channel.
Now let us see how we can integrate Razorpay into Android Studio.
Steps for Razorpay Integration in Android
- So, now download Composer from the link: https://getcomposer.org/
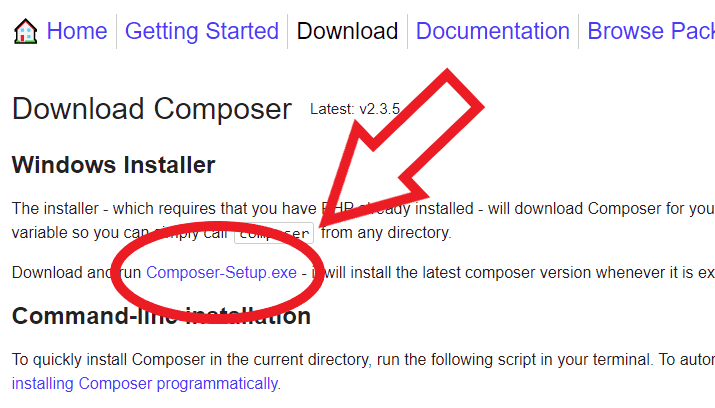
Click the download button and then click the Composer-Setup.exe
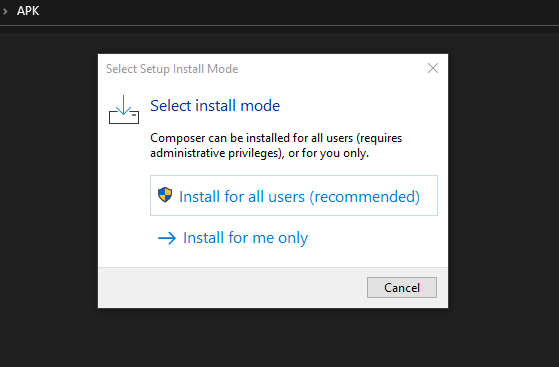
2. Double click on the downloaded exe file.
3. Installation process of the Composer will start shortly.

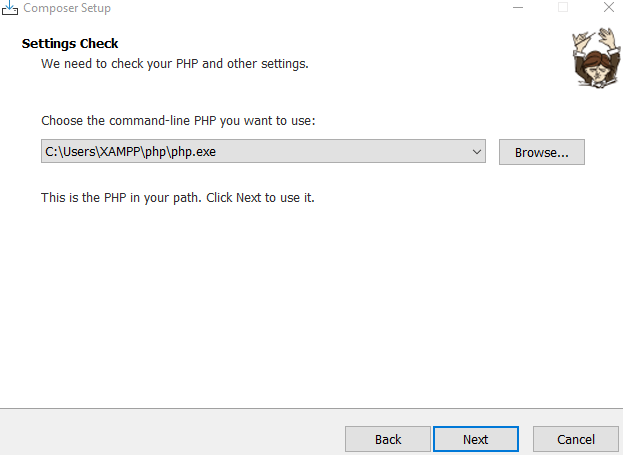
5. So, select the Location of the PHP installation, that’s the php.exe file. If you are using XAMPP it will be inside XAMPP\php\php.exe
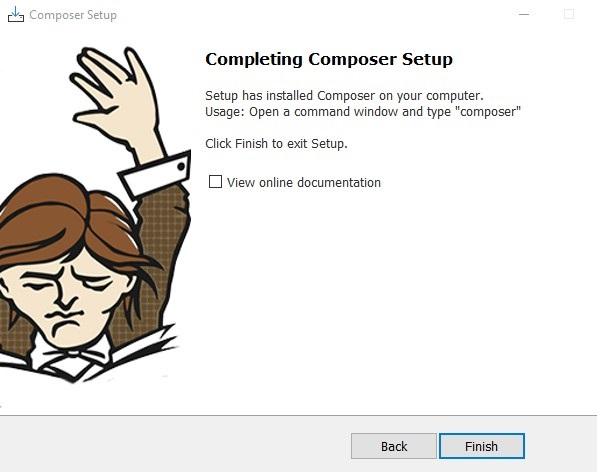
6. Complete the installation process of the Composer.
Adding Composer path on Windows:
We have to make sure we have the composer path added. If not you have to add it. Press Windows Key and Search environment variables. Select environment variables and then select path as shown in the image.
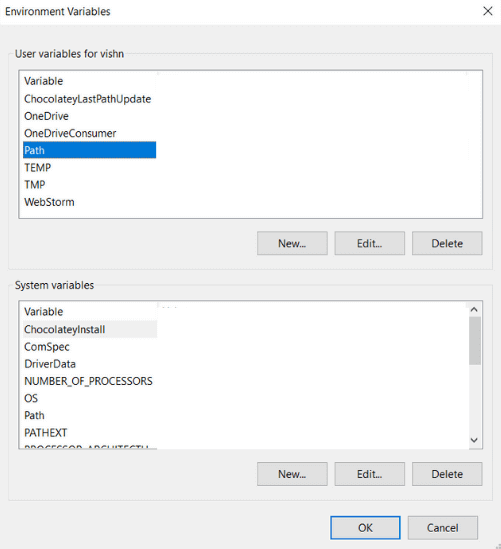
Now add the path by clicking new, and click OK and that all.
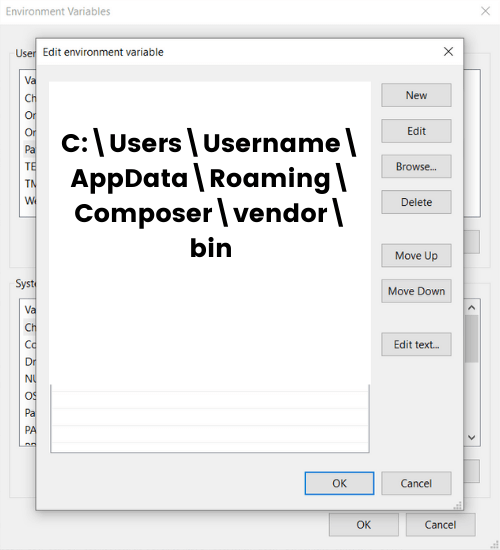
Example of the path: C:\Users\Username\AppData\Roaming\Composer\vendor\bin
this can be different for different users.
That’s all, now you have installed composer.
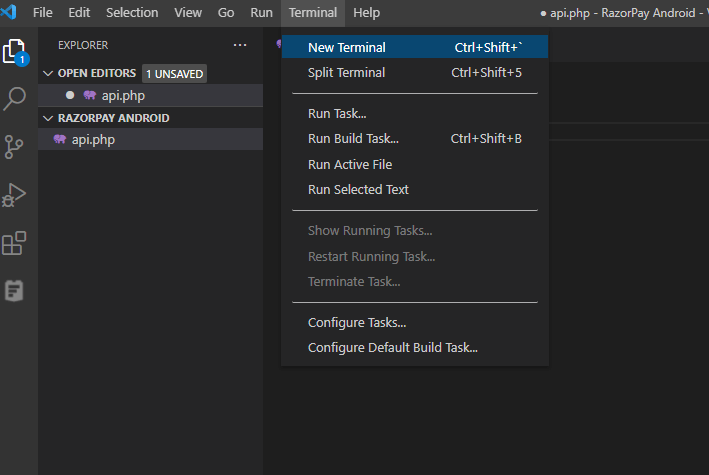
7. Open a new Window of VS Code. and the open terminal (While creating this project make sure to save this project inside XAMMP>htdocs>folder_name). We have named the project Razorpay_Android which will also be our folder name.
Implementing the API for Creating Razorpay Order
Open the terminal in VS Code, in the menu section Terminal – > New Terminal.
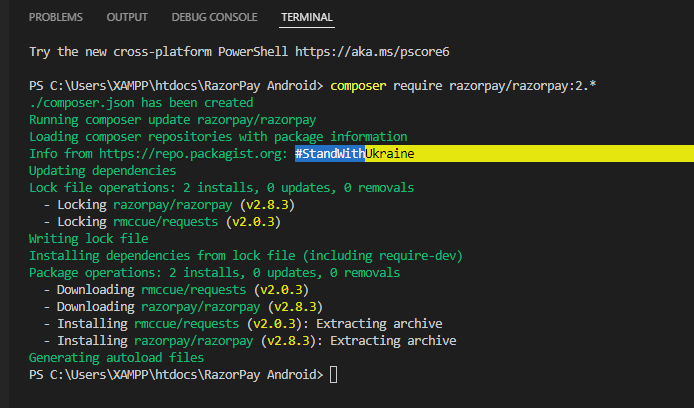
8. Now inside the terminal type this command. : composer require razorpay/razorpay:2* and hit enter so the installation process will start.
composer require razorpay/razorpay:2.*
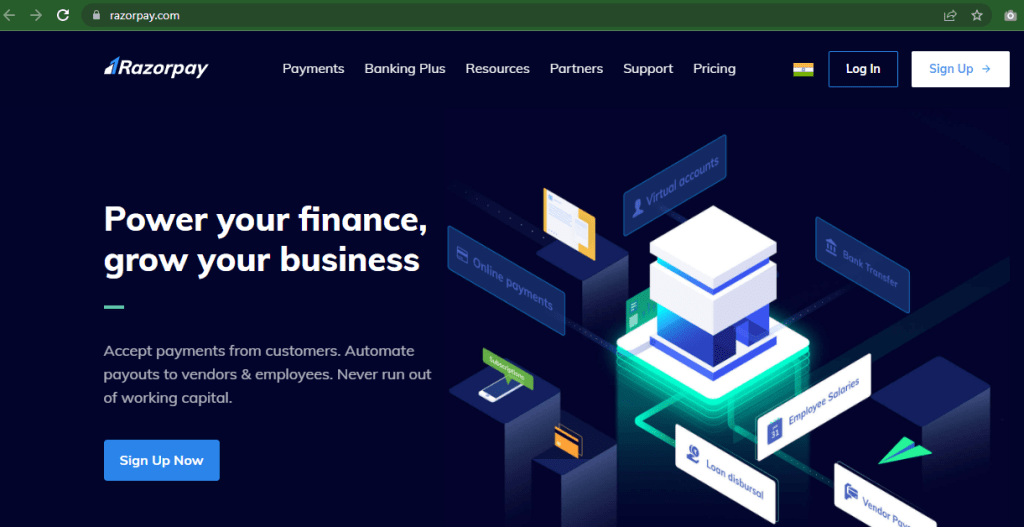
9. So, Now open the browser and search Razorpay or go to the link: https://razorpay.com/
Log in, if you already have an account or sign up for a new account.
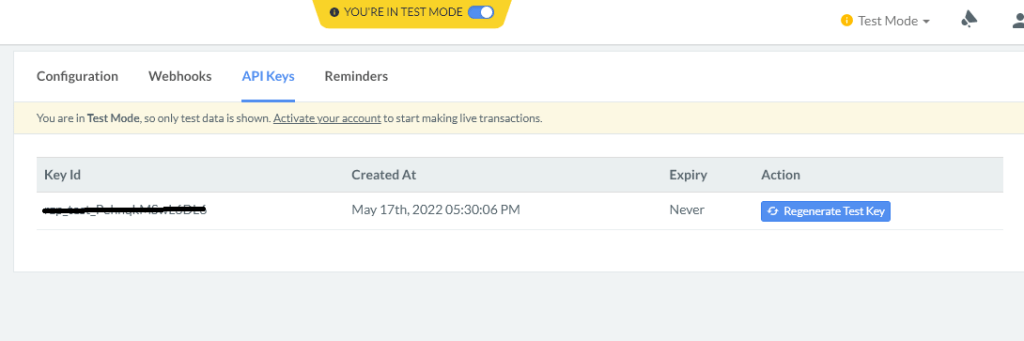
10. After the login process you will see a dashboard of Razorpay. So now open settings and you will find an option there, API key. And create a new API key.
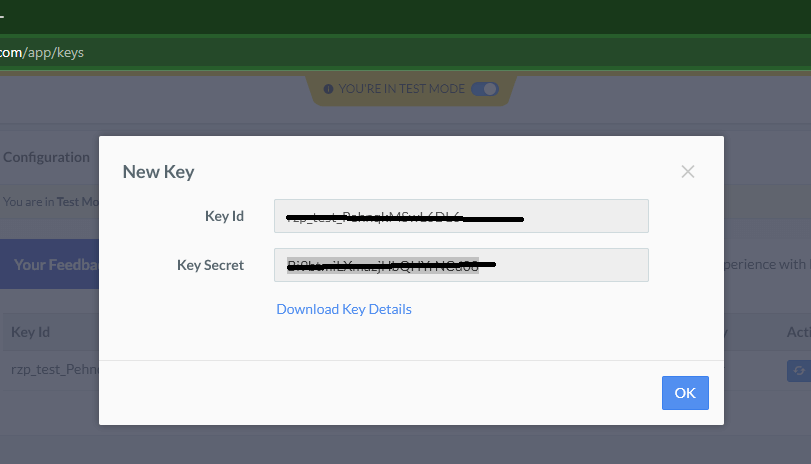
Keep this Key ID and Key Secret store somewhere safe, this is important for Creating the Razorpay order API.
Then open VS Code and you will see that after installing the composer there are some folders auto-created. So, create an api.php file inside Razorpay Android Folder.
11. Require the autoload.php (vendor/autoload.php) file in the api.php file and from the vendor folder.
require "vendor/autoload.php";12. create two new variables one for KeyID and another one for Keysecret. and paste the keyID and keySecret that we got from Razorpay.
$keyID = "keyID";
$keySecret = "keySecret";
13. So, create a new object of API.
use Razorpay\Api\Api;

$api = new Api($keyID , $keySecret);
14. Then Now create the Order variable of Array which will contain.
- receipt
- amount
- currency
15. Now let us initialize these variables. Note that the receipt number should always be random. and currency can be of any state, country of INR, USD, etc.
$receipt = "order_receipt" .rand(1,10000)."_".time();
$amount = 1*100;
$currency = "INR" //can be USD and any as well
$order = $api->order->create([
        'receipt' => $receipt;
        'amount' => $amount;
        'currency' => $currency;

    ]);
16. Than Access the order ID that will be generated by Razorpay itself and stored inside the array $order.
$order_details['order_id']=[$order['id']];
$order_details['receipt']= $order['receipt'];
$order_details['amount']= $order['amount'];
$order_details['currency']= $order['currency'];
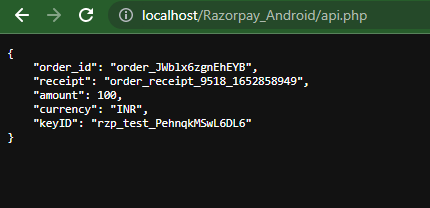
$order_details['keyID']= $keyID;17. So, let us print the data of API, you can use JSON_PRETTY_PRINT to let the printing system more systematic.
echo json_encode($order_details, JSON_PRETTY_PRINT);18. So, now initializes header because we are using JSON.
header('Content-Type: application/json');The output would look like the below.
Implementing the android Part for Razorpay Integration in Android
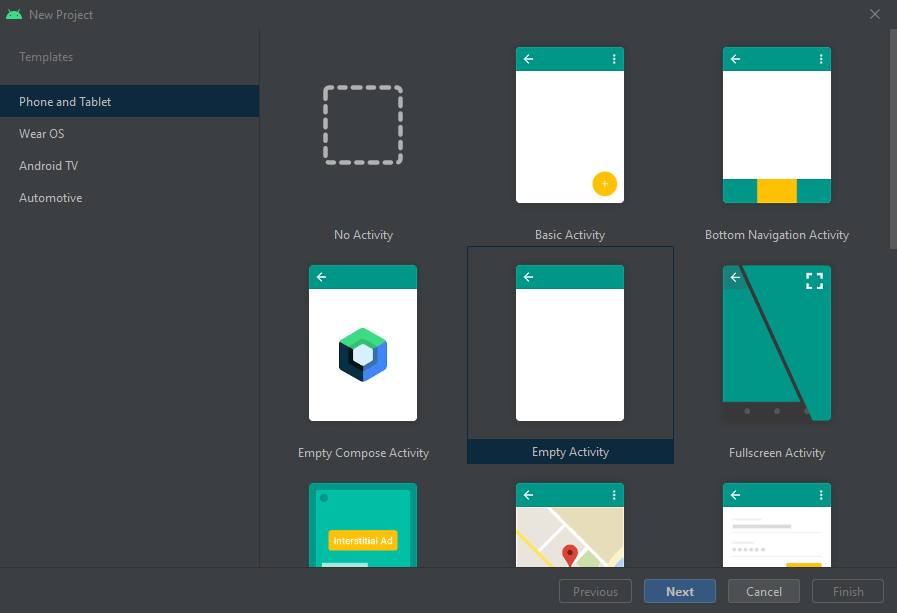
19. So, Now open Android Studio and create New Project.
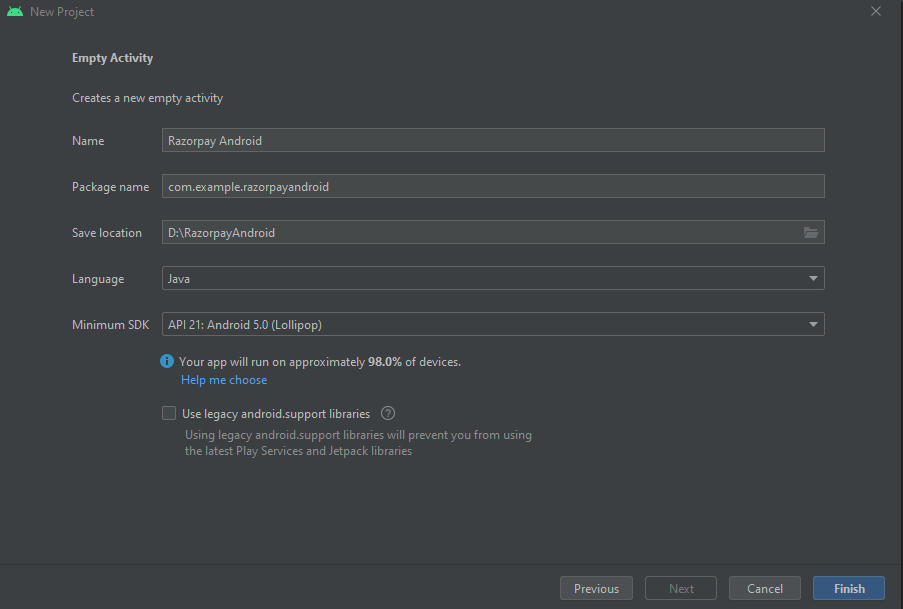
20. Give a name to the Android Application.
21. So, Open build.gradle (app>gradle Scripts>build. gradle for modules) file from the Android Studio project. And add the dependency:
implementation 'com.android.volley:volley:1.2.1'
implementation 'com.razorpay:checkout:1.6.19'
22. Open the AndroidMenifest.xml file (app>manifest>AndroidMenifest). and add user permissions for INTERNET.
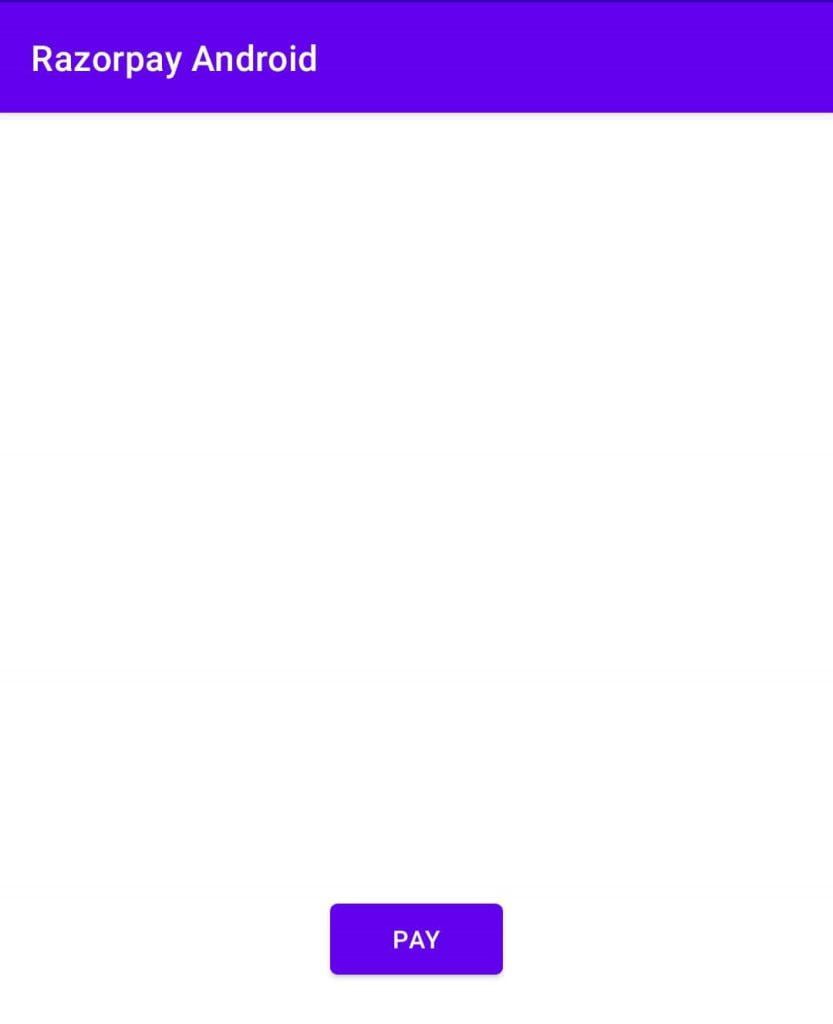
<uses-permission android:name="android.permission.INTERNET"/>23. So, Open the activity_main.xml file (app<res<layout<activity_main.XML) and add Button.
    <Button
        android:layout_width="wrap_content"
        android:text="Pay"
        android:layout_height="wrap_content"
        android:id="@+id/btnPay"/>
24. Open MainActivity.java(app>java>com.example.razorpayandroid>MainActivity.java) and initialize button.
Button button = findViewById(R.id.btnPay);25. Then, Create onClickListener for the button.
button.setOnClickListener(new View.OnClickListener() {
                    @Override
                    public void onClick(View v) {

                }
26. We are using Google Volley to get the data from the API. So, Paste Volley Request to get Data from JSON API.
RequestQueue queue = Volley.newRequestQueue(getApplicationContext());27. So, now open the command prompt and type ipconfig to get the local IP Address and copy ipv4 address.
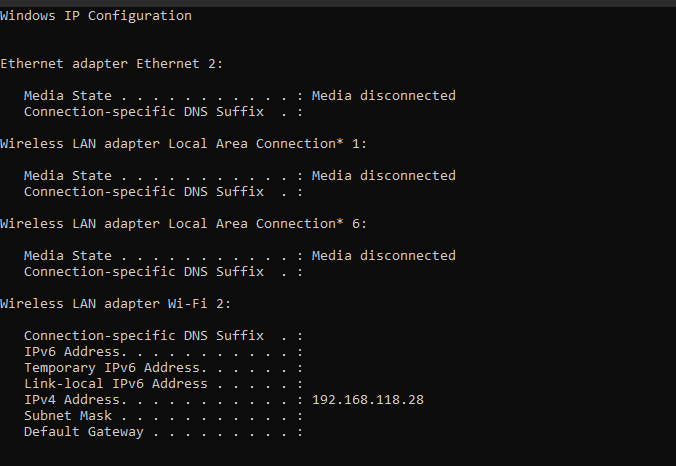
And paste the IP Address at the browser where you were running API and select localhost from the URL and paste the IP address instead of localhost.

28. So, OPen Android studio and inside onClickListener create a new String variable. and paste the above browser link of API running through the IP address. make sure you do not use HTTPS.
This local IP will only be available within the same network. We recommend you use an emulator or be connected under the same WIFI connection so that you won’t come across errors related to this.
String url ="http://192.168.118.28/Razorpay_Android/api.php";29. Create a function to pass JSON data. Read more on Parsing JSON in Android.
StringRequest stringRequest = new StringRequest(Request.Method.GET, url,
new Response.Listener<String>() {
Override
public void onResponse(String response)
{
parseResponse(response);
}
},
30. So, now define parseResponse outside the onCreate function.
public void parseResponse(String res)
{

}
31. So, Create a Variable for JSON Data.
String order_id,receipt,amount,currency,keyID;32. Create an object for JSONObject and surround it with try catch block.
try {
        JSONObject object = new JSONObject(res);

        initPayment(order_id,amount,currency,keyID);
    } catch (JSONException e) {
        e.printStackTrace();
    }
33. So, get the order id and all other data of API.
order_id = object.getString("order_id");
        receipt = object.getString("receipt");
        amount = object.getString("amount");
        currency = object.getString("currency");
        keyID = object.getString("keyID");
34. Create a new Function for Payment.
public void initPayment(String order_id, String amount, String currency, String keyID)
{
}
35. So, Create an object for checkout.
Checkout checkout = new Checkout();36 Set keyID and logo image using checkout object.
checkout.setKeyID(keyID);
checkout.setImage(R.mipmap.ic_launcher);
37. So, Add this try catch block after setting keyID and logo image.
try
{
JSONObject options = new JSONObject();
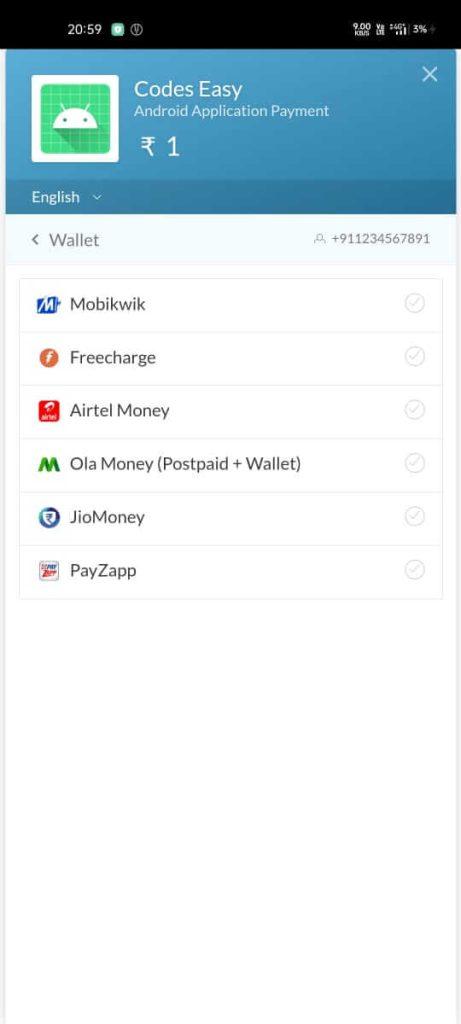
options.put("name", "Codes Easy"); //Company name
options.put("description" , "Android Application Payment");
options.put("image", "https://s3.amazonaws.com/rzp-mobile/images/rzp.png");
options.put("order_id", order_id);
options.put("theme.color", "#3399cc");
options.put("currency",currency );
options.put("amount", amount);//pass amount in currency subunits
JSONObject retryObj = new JSONObject();
retryObj.put("enabled", true);
retryObj.put("max_count", 4);
options.put("retry", retryObj);
checkout.open(MainActivity.this, options);
}
catch(Exception e)
{
Log.e("Error", "Error in starting Razorpay Checkout", e);
}38. So, now implement PaymentResultListener to AppCompatActivity.
public class MainActivity extends AppCompatActivity implements PaymentResultListener
{
}
After that click on the red line and type alt + enter this will show a window of two functions. Or you could simply add the functions onPaymentSuccess and onPaymentError outside onCreate function.
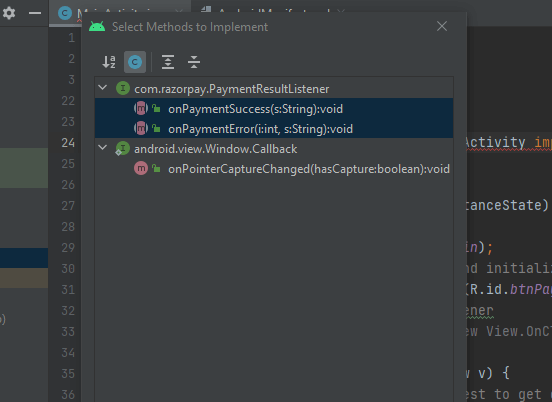
Click “Next” to proceed and these two functions will automatically be created outside the onCreate Method.
 public void onPaymentSuccess(String s) {}
public void onPaymentError(int i, String s) {}
39. Now inside onPaymentSuccess add an Alert box to display an alert when the payment gets successful.
 AlertDialog.Builder builder = new AlertDialog.Builder(this);
        builder.setTitle("Payment Success");
        builder.setMessage("Payment ID" + s);
        builder.show();
40. Now inside onPaymentError we will display the actual reason for the failure of the payment.
public void onPaymentError(int i, String s) {
        try {
            JSONObject object = new JSONObject(s);
            JSONObject object1 = object.getJSONObject("error");


            String reason = object1.getString("reason");
            Toast.makeText(getApplicationContext(), reason,Toast.LENGTH_SHORT).show();
        } catch (JSONException e) {
            e.printStackTrace();
        }
    }
41. So, Call initPayment method inside parseResponse. Check below for complete code of the activity file.
initPayment(order_id,amount,currency,keyID);MainActivity.java:
package com.example.razorpayandroid;

import androidx.appcompat.app.AlertDialog;
import androidx.appcompat.app.AppCompatActivity;

import android.os.Bundle;
import android.util.Log;
import android.view.View;
import android.widget.Button;
import android.widget.Toast;

import com.android.volley.Request;
import com.android.volley.RequestQueue;
import com.android.volley.Response;
import com.android.volley.VolleyError;
import com.android.volley.toolbox.StringRequest;
import com.android.volley.toolbox.Volley;
import com.razorpay.Checkout;
import com.razorpay.PaymentResultListener;

import org.json.JSONException;
import org.json.JSONObject;


public class MainActivity extends AppCompatActivity implements PaymentResultListener {

    @Override
    protected void onCreate(Bundle savedInstanceState) {
        super.onCreate(savedInstanceState);
        setContentView(R.layout.activity_main);
                Button button =findViewById(R.id.btnPay);
                button.setOnClickListener(new View.OnClickListener() {
                    @Override
                    public void onClick(View v) {
                        RequestQueue queue = Volley.newRequestQueue(getApplicationContext());
                            String url ="http://192.168.118.28/Razorpay_Android/api.php";

                        StringRequest stringRequest = new StringRequest(Request.Method.GET, url,
                                new Response.Listener<String>() {
                                    @Override
                                    public void onResponse(String response) {

                                        parseResponse(response);

                                    }
                                },
                                new Response.ErrorListener() {
                            @Override
                            public void onErrorResponse(VolleyError error) {

                            }
                        });

                        queue.add(stringRequest);
                    }


                });
    }
public void parseResponse(String res)
{
    String order_id,receipt,amount,currency,keyID;
    try {
        JSONObject object = new JSONObject(res);
        order_id = object.getString("order_id");
        receipt = object.getString("receipt");
        amount = object.getString("amount");
        currency = object.getString("currency");
        keyID = object.getString("keyID");


        initPayment(order_id,amount,currency,keyID);
    } catch (JSONException e) {
        e.printStackTrace();
    }


}


    public void initPayment(String order_id, String amount, String currency, String keyID)
    {
        Checkout checkout = new Checkout();
    checkout.setKeyID(keyID);
    checkout.setImage(R.mipmap.ic_launcher);
    try
    {

        JSONObject options = new JSONObject();
        options.put("name", "Codes Easy");  //Company name
        options.put("description" , "Android Application Payment");
        options.put("image", "https://s3.amazonaws.com/rzp-mobile/images/rzp.png");
        options.put("order_id", order_id);
        options.put("theme.color", "#3399cc");
        options.put("currency",currency );
        options.put("amount", amount);//pass amount in currency subunits
        JSONObject retryObj = new JSONObject();
        retryObj.put("enabled", true);
        retryObj.put("max_count", 4);
        options.put("retry", retryObj);

        checkout.open(MainActivity.this, options);
    }
    catch(Exception e)
    {
        Log.e("Error", "Error in starting Razorpay Checkout", e);
    }

    }


    @Override
    public void onPaymentSuccess(String s) {
        AlertDialog.Builder builder = new AlertDialog.Builder(this);
        builder.setTitle("Payment Success");
        builder.setMessage("Payment ID" + s);
        builder.show();
    }


    @Override
    public void onPaymentError(int i, String s) {
        try {
            JSONObject object = new JSONObject(s);
            JSONObject object1 = object.getJSONObject("error");


            String reason = object1.getString("reason");
            Toast.makeText(getApplicationContext(), reason,Toast.LENGTH_SHORT).show();
        } catch (JSONException e) {
            e.printStackTrace();
        }
    }
}
Outputs:
Select Payment Method:
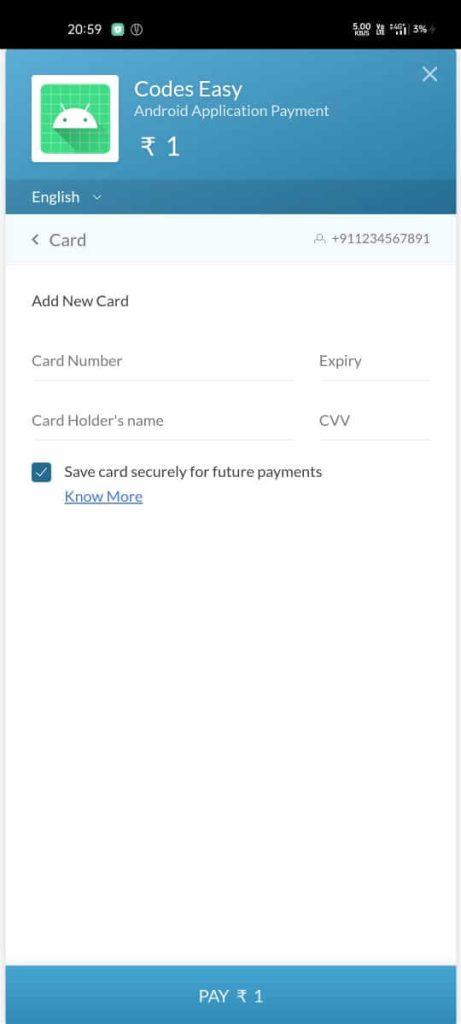
Pay from Card:
Pay from Bank:
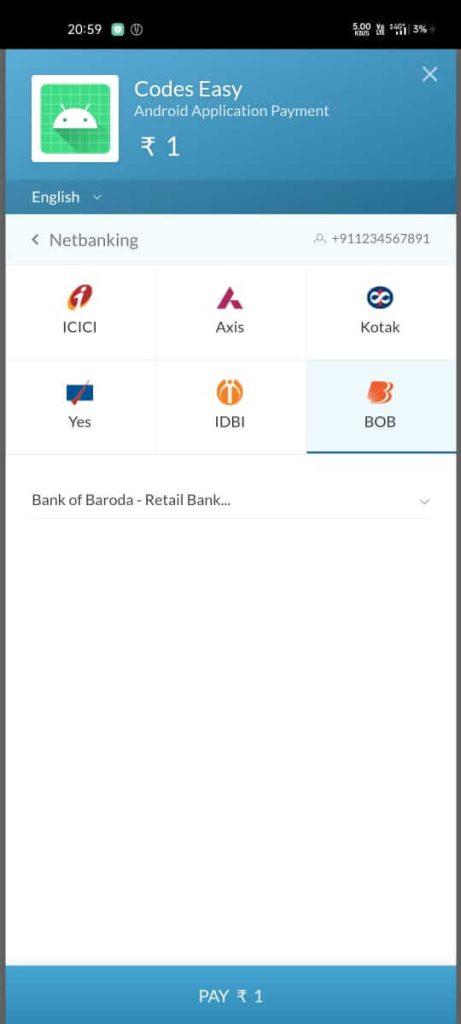
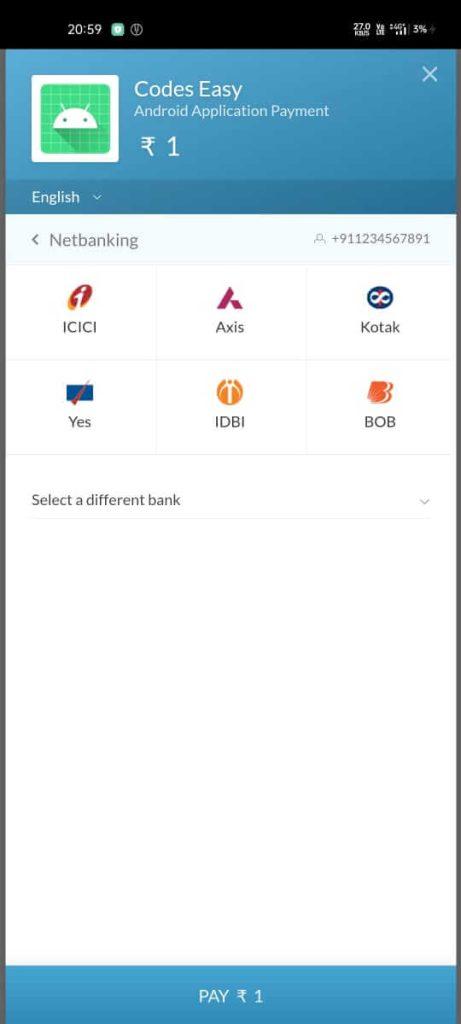
Select Bank branch:
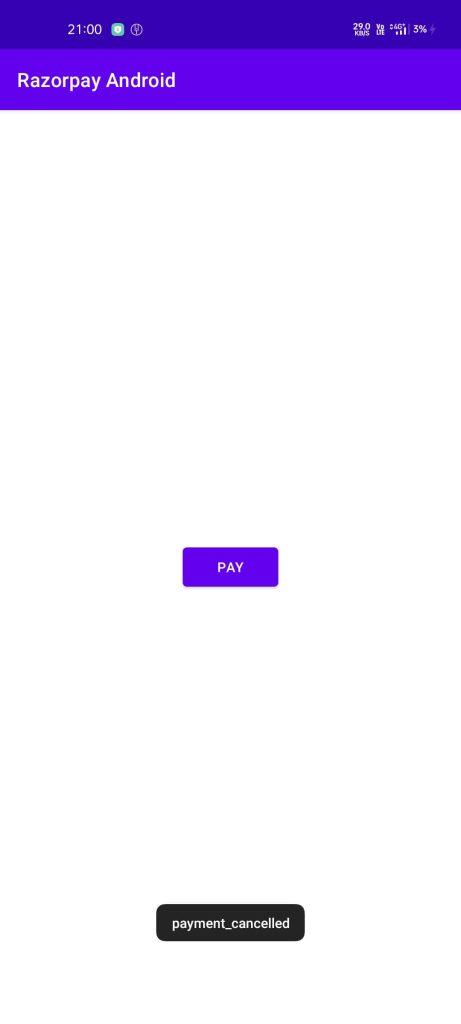
Displaying error when Payment gets Cancel:
In this article, we have seen Razorpay Integration in Android and the different payment methods provided to make payments. If you have any doubts feel free to drop your comments, we will be happy to help you.